Documentation
Here is the documentation for Pynterface!
Text Styling and Coloring
This is simply an alternative to colorama <https://github.com/tartley/colorama>, which I attempted to replicate, for fun, with this part of the package! It includes the additional ability to set custom RGB values, or custom colors with custom RGB values.
You can import this module using:
import pynterface.style

# import individual classes
from pynterface.style import Color, Background, Text
For a quick demonstration of the different presets supported, you can call the following:
from pynterface.style import demo
demo()  # prints presets and the ways to call them
Preset Options
For the Text class, which manages text styles, here are the preset values and their corresponding ANSI codes:
RESET_ALL =     "\033[0m"
RESET_STYLE =   "\033[22m"

BOLD =          "\033[1m"
DIM =           "\033[2m"
ITALIC =        "\033[3m"
UNDERLINE =     "\033[4m"
BLINKING =      "\033[5m"
INVERTED =      "\033[7m"
STRIKETHROUGH = "\033[9m"

HIDE_CURSOR =   "\033[?25l"
SHOW_CURSOR =   "\033[?25h"
For the Color class, which manages the color of text, here are the preset values and their codes:
RESET_COLOR =   "\033[39m"
RESET_ALL =     "\033[0m"

BLACK =     "\033[30m"
RED =       "\033[31m"
GREEN =     "\033[32m"
YELLOW =    "\033[33m"
BLUE =      "\033[34m"
PURPLE =    "\033[35m"
CYAN =      "\033[36m"
WHITE =     "\033[37m"

BLACK_BRIGHT =     "\033[90m"
RED_BRIGHT =       "\033[91m"
GREEN_BRIGHT =     "\033[92m"
YELLOW_BRIGHT =    "\033[93m"
BLUE_BRIGHT =      "\033[94m"
PURPLE_BRIGHT =    "\033[95m"
CYAN_BRIGHT =      "\033[96m"
WHITE_BRIGHT =     "\033[97m"
For the Background class, which manages the background of the text, here are the supported presets and their codes:
RESET_BACKGROUND =  "\033[49m"
RESET_ALL =         "\033[0m"

BLACK =     "\033[40m"
RED =       "\033[41m"
GREEN =     "\033[42m"
YELLOW =    "\033[43m"
BLUE =      "\033[44m"
PURPLE =    "\033[45m"
CYAN =      "\033[46m"
WHITE =     "\033[47m"

BLACK_BRIGHT =     "\033[100m"
RED_BRIGHT =       "\033[101m"
GREEN_BRIGHT =     "\033[102m"
YELLOW_BRIGHT =    "\033[103m"
BLUE_BRIGHT =      "\033[104m"
PURPLE_BRIGHT =    "\033[105m"
CYAN_BRIGHT =      "\033[106m"
WHITE_BRIGHT =     "\033[107m"
Text Styles
Here are what the different text styles look like, and how you call them:
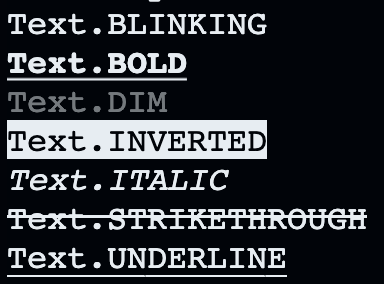
The Text.BLINKING, which cannot be displayed in an image, produces blinking text.
You can also move the cursor up, down, left, and right, as follows:
Text.MOVE_CURSOR_UP(lines: int = 1)
Text.MOVE_CURSOR_DOWN(lines: int = 1)
Text.MOVE_CURSOR_LEFT(cols: int = 1)
Text.MOVE_CURSOR_RIGHT(cols: int = 1)
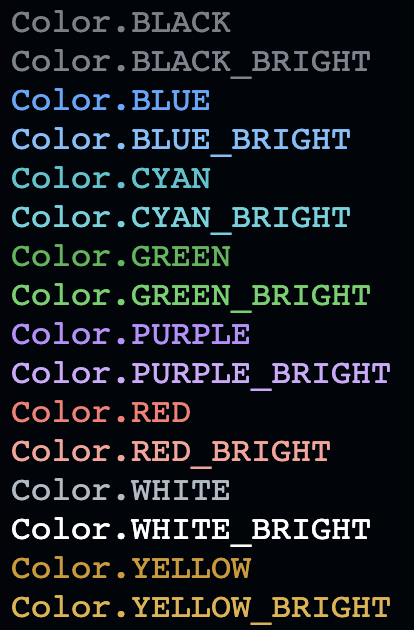
Colors
Here are what the different colors look like and how you call them:
You can also call a custom RGB color, in the following format:
Color.RGB(rgb: tuple[int, int, int])
Or, you can set a color and call it later on,
Color.SET(name: str, rgb: tuple[int, int, int])
Here is an example:

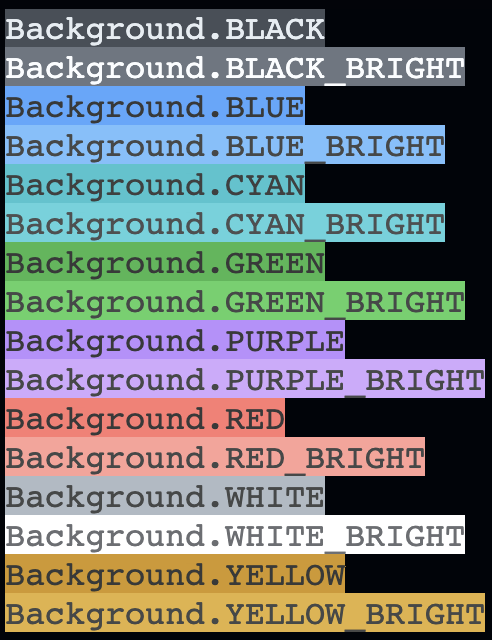
Backgrounds
Here are what the different background colors are, and how you call them:
You can also call a custom RGB background, in the following format:
Background.RGB(rgb: tuple[int, int, int])
Or, you can set a color and call it later on,
Background.SET(name: str, rgb: tuple[int, int, int])
Here is an example:

Input Methods
Import this subsection of the module using the following:
import pynterface.input

# for individual menus
from pynterface.input import bounded_int, two_dim_array
from pynterface import bounded_int, two_dim_array
Bounded Integer
>>> option = bounded_int(lower=2, upper=9)
Please enter a number between 2 and 9: 10
The number must be between 2 and 9: no
You must enter an integer: 7
>>> option
7
bounded_int(lower: int,
            upper: int,
            prompt: str = None,
            type_error: str = None,
            bounds_error: str = None) -> int
lower and upper are the lower and upper bounds for the integer, both inclusive.
The prompt is what asks for the user input, and is defaulted to “Please enter a number between <lower> and <upper>: “.
The type_error is what is printed when the number cannot eb converted to an integer. It is defaulted to “You must enter an integer: “.
The bounds_error is what is printed when a number is out of bounds. It is defaulted to “The number must be between <lower> and <upper>: “.
Two-Dimensional Array
>>> from pynterface import two_dim_array
>>> arr = two_dim_array(rows=2, cols=3, item_type=int)
3 5 1
4 7 21
>>> arr
[[3, 5, 1], [4, 7, 21]]
two_dim_array(rows: int,
              cols: int = None,
              delimiter: str = " ",
              item_type: int = str) -> list[list[Any]]
rows and cols represent the rows and columns of the 2d array respectively. If you leave columns as blank, there will be no checking for accurately sized columns.
delimiter is the thing that seperates each item in a row. You can enter '' as a delimeter if you want to seperate characters in a string.
item_type is the type of each element. You can pass in things like int or float to automatically convert each item.
Yes/No Input
>>> ans = yes_no("Yes or no? ")
Yes or no? Okay
Invalid choice; enter a proper form of yes or no: Yes
>>> ans
True
yes_no(prompt: str,
       error_prompt: str = "Invalid choice; enter a proper form of yes or no: ") -> bool:
The supported options for yes and no respectively are shown below:
yes = ['yes', 'y', '1']
no = ['no', 'n', '0']
prompt is what you enter as the prompt for your input.
error_prompt is what is printed when an invalid choice in entered, prompting the user for another choice.
Output Methods
Import this subsection of the module using the following:
import pynterface.printing

# for individual menus
from pynterface.printing import clear_window, clear_print, smooth_print, centered, gradient
from pynterface import clear_window, clear_print, smooth_print, centered, gradient
Clear Window
>>> clear_window()
Simply clears the terminal screen. This is the same as calling os.system('clear') but is consistent throughout operating systems.
Clear Print
>>> message = "Hello world"
>>> clear_print(message)
Hello world
clear_print(message: Any, **print_kwargs) -> None
Clears the screen and prints a message onto the empty canvas. This is the same as calling clear_window and then calling print.
message is what you want to print - it can be anything, as it is directly passed into the builtin print function.
print_kwargs are keyword arguments that also get passed directly into the builtin print function.
Smooth Print
>>> message = "Hello world"
>>> smooth_print(message, delay_ms=50)
Hello world
smooth_print(message: str,
             delay_ms: float = 25,
             end: str = "\n") -> None
Prints text as a smooth stream, waiting each time a character is printed.
message is the message to be printed.
delay_ms is the delay between each character being printed, in milliseconds.
end is the character printed at the end of everything being printed, and is "n" by default like the builtin print function.
Centered
>>> message = "Hello world\nThis is a Python Program"
>>> print(centered(message))
         Hello world
   This is a Python Program
centered(message: Union[str, Iterable[str]],
         margin: int = 2) -> str
Outputs a string, which a piece of text that, when printed, is centered.
message is the string you want to be centered. It can also be a list of strings, which are each split into their respective lines.
margin is the margin of space the left side of the text being printed.
Horizontal Gradient
>>> __author__ = "Vivaan Singhvi"
>>> __version__ = "0.2.3"
>>> message = ["Welcome to Pynterface!", f"Author: {__author__}", "", f"Version:{__version__}", ""]
>>> centered = centered(message)  # pynterface's centered function
>>> print(gradient(centered, (0, 150, 0), (0, 0, 150)))

gradient(message: str,
         left_rgb: tuple[int, int, int],
         right_rgb: tuple[int, int, int],
         mode: str = "background") -> str
Prints the given text with a horizontal gradient background between two RGB bounds.
message is the message that needs to be printed.
left_rgb is the color on the left side of the text.
right_rgb is the color on the right side of the text.